


Comparison of ESP8266 Modules: ESP-01, ESP-05, ESP-12, ESP-201
In this article, I'll lead you through the diverse range of ESP8266-based modules available. While it's not an exhaustive compilation, I've assembled a selection of modules that I've personally evaluated and reviewed. If you think there's a significant aspect I've missed, please feel free to bring it to my attention. Each module discussed here comes with its own set of advantages and disadvantages, contingent upon its intended application. Whether you're considering using a module as a Wi-Fi shield for an Arduino or planning for a standalone node, factors such as breadboard compatibility, pin availability, the necessity for external components like a serial-to-USB adapter, as well as considerations of size and cost, all play significant roles in the decision-making process.
Below are condensed summaries of the key points covered in this post, ideal for those who are pressed for time and prefer a quick overview:
Comparison of Bare Modules
| ESP-01 | ESP-05 | ESP-12 | ESP-201 | Testboard | |
| GPIO Pins | 2 | - | 11 | 11 | 11 |
| ADC | - | - | 1 | 1 | 1 |
| Antenna | PCB | PCB | PCB | External/PCB | PCB |
| USB-To-Serial | No | No | No | No | No |
| Breadboard friendly | Medium | Good | Bad | Good | Bad |
| Form factor | Small | Small | Medium | Big | Very big |
| Price | ~$3 | ~$3 | ~$3 | ~$3 | ~$6.50 |
| Application | Simple Standalone mode or wifi shield for Arduino | Wifi Shield | Standalone | Standalone | Prototyping |
| Where to buy | www.blikai.com | - | www.blikai.com | - | - |
Comparison of Development Modules
| NodeMCU V0.9 | NodeMcu V1.0 | Wemos D1 Mini | Wemos D1 R2 | LoLin V3 NodeMcu Board | |
| Branded | NodeMCU | DOIT | Wemos | Wemos | LoLin |
| GPIO Pins | 11 | 11 | 11 | 11 | 11 |
| ADC | 1 | 1 | 1 | 1 | 1 |
| Antenna | PCB | PCB | PCB | PCB | PCB |
| ESP8266 Module | ESP12 (AI-Thinker) | ESP12E (AI-Thinker) | ESP12E (Wemos) | ESP12E (Wemos) | ESP12E (Ai-Thinker) |
| USB-To-Serial | Yes | Yes | Yes | Yes | Yes |
| Serial Chip | CH340G | CP2102/CH340G | CH340G | CH340G | CH340G |
| Breadboard | Bad (covers many pins) | Very Good | Very Good(after soldering) | Bad(Arduino Form Factor) | Bad(Covers many pins) |
| Form factor | Big | Big | Medium | Very big | Big |
| Application | Development Beginner | Development Beginner | Development Advanced (soldering required) | Development Form compatibility with Arduino Shields | Development Beginner |
ESP-01
This module stands out as one of the most widely recognized, despite its lack of convenience. Its compact dimensions (24.75mm x 14.5mm) make it suitable for various enclosures. It features two GPIO pins for peripheral control. With correct wiring and the use of a serial-to-USB adapter, the process of flashing alternative firmware becomes a simple task. Out of the box, it typically comes equipped with one of several versions of the AT firmware, facilitating its use alongside an Arduino. One significant drawback of this module is its pin placement, which renders it unsuitable for direct insertion into a breadboard due to the close proximity of the pin rows, risking short circuits. Nonetheless, it's still feasible to utilize this module on a breadboard by either constructing a breadboard adapter or employing female-to-male DuPont wires for connection.
ESP-05
This module has a specific function: serving as a compact Wi-Fi shield for seamless integration with an Arduino or a comparable microcontroller. Available in various configurations, one version offers four pins providing 3.3V, GND, RX, and TX for communication with the Arduino. Another variant includes an additional reset pin, allowing manual or programmatic module resets. Its single row of pin posts facilitates easy integration with a breadboard. However, users are typically confined to the preloaded firmware unless they're willing to modify the module by cutting leads and soldering pins, with AT firmware versions varying across boards.
ESP-12
Equipped with extensive features, the ESP-12 module unlocks the full potential of the ESP8266. It boasts 11 GPIO pins and a 10-bit resolution analog-to-digital converter (ADC). Additionally, it offers straightforward configuration for deep-sleep mode, purportedly enabling the module to run for up to three years on two AA batteries. Nevertheless, its inability to be compatible with breadboards presents a prototyping challenge, requiring tailored solutions. Despite this drawback, its wide availability and extensive access to chip pins make it a favored option for integrated modules, including test boards and the initial version of the NodeMCU module. If your project involves standalone operation, chances are high that the ESP-12 module will play a crucial role in its implementation.
ESP-201
Originally designated as ESP-12, this module gained popularity under the name ESP-201 following the discovery of a name conflict. As a nod to traditional BASIC line addressing conventions, the creators appeared to prevent any future naming conflicts by incorporating a safety margin into the numbering scheme. Presently, it's my favored module for prototyping because of its compatibility with breadboards and similar access to chip pins, reminiscent of the ESP-12. However, a couple of caveats exist: the four pins at the module's head prevent direct insertion into a breadboard, but they can be easily bent to ninety degrees or unsoldered and relocated to the upper side of the module. Additionally, the module conceals many breadboard pins, leaving only one row visible on each side. If more pins are needed, extending a 5-pin row by connecting it to another row on the breadboard is necessary. Equipped with a printed PCB antenna and an external antenna connector, this module is ideal for bridging longer Wi-Fi distances. By replacing the stock wire antenna with a high-gain antenna, sensitivity can be further enhanced.
Test Board
Several test boards are available, as described below and depicted in the accompanying images. This test board incorporates a battery pack, preconfigured LEDs, and a light-dependent resistor linked to the ADC. It features an ESP-12 module, offering convenient access to all pins. Additionally, it features a jumper for easy firmware flashing. Fitted with a voltage regulator, the board reduces the battery pack's 4.5 volts to the 3.3 volts necessary for powering the ESP8266. The battery pack can be effortlessly swapped out with a USB connector's power lines. Two main applications for this board are envisioned: Firstly, deploying a standalone node powered solely by the attached battery pack, possibly supplemented by a small breadboard for sensor connections, while ensuring that the PCB antenna remains unobstructed to ensure optimal reception. Secondly, quickly testing program code using the simplified peripheral components, such as LEDs and the light-dependent sensor connected to the ADC. An update: this board has been operational on three AA batteries for over 1000 hours (more than 40 days).
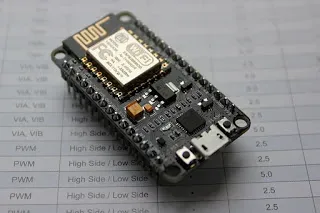
NodeMCU Module V0.9 (Outdated)
This module presents a notable departure from the previously discussed modules. It arrives equipped with all essential components for immediate use, featuring a built-in serial-to-USB adapter and a micro USB plug for both power supply and programming purposes. Initially, my expectations for this module were high, as it pledged to significantly simplify ESP8266-based application development: necessitating fewer wirings compared to other modules, obviating the need for an external power supply or a separate serial-to-USB adapter, and providing convenient reset and flash mode switches.Moreover, its compatibility with breadboards allows for streamlined peripheral wiring with minimal wire clutter. However, the actual situation unfolded in a slightly divergent manner: While attempting to flash the module on my Mac using the integrated serial-to-USB adapter, I encountered difficulties despite installing the most recent driver. To resolve this, I had to utilize an external serial converter. Although this wasn't a major obstacle for me, as I seldom update firmware and already owned an external converter, it did prove to be inconvenient. Additionally, the module's current form factor obstructs access to all breadboard pins within its vicinity, necessitating the insertion of bridges to expose some pins, albeit with limitations. Given its higher price point, this module is likely best suited for development phases. Once the software and required external components are finalized, users may opt for alternative modules or design custom solutions integrating necessary components. At the time of writing, only the original version of the NodeMCU module is accessible, with intentions to release an enhanced version soon to tackle the previously mentioned issues. I eagerly anticipate testing the updated version upon its release, as it holds promise as a compelling all-in-one alternative for Arduino-based IoT nodes.
NodeMCU Module V1.0
Recently, the NodeMCU team unveiled their latest design, marking a significant improvement over the initial release. I've had the chance to test it with both the NodeMCU LUA firmware and the Arduino IDE. This version showcases the new ESP-12E module, boasting 4MB of flash memory and supplementary pin-outs. Compared to its predecessor, the V1.0 variant boasts a narrower profile, leaving one row of pins on each side of a standard breadboard, ideal for prototyping purposes. Additionally, a notable improvement is the automatic management of the reset/flash button combination within the Arduino IDE, simplifying the code upload process. With the latest Arduino/ESP8266 board configuration, upload speeds of up to 921600 baud are attainable, facilitating swift code uploads. Overall, this is the eagerly awaited development board enthusiasts have been anticipating. Although its price point might be marginally higher compared to other boards, starting at approximately $8 for potential clones, it's unquestionably a worthwhile investment, given the cost savings on additional hardware like a serial-to-USB converter.
Summary
Choosing the right module depends on your specific application requirements. If affordability and a compact form factor are your primary considerations, and you require a standalone module with minimal GPIO pins, then the ESP-01 is a suitable choice. For budget-friendly Wi-Fi connectivity with an Arduino, the ESP-05 is a viable choice. The ESP-12 might catch your attention if your peripherals depend on the SPI or I2C bus, or if you need a multitude of GPIO pins and are proficient in soldering. The ESP-201 facilitates solder-free prototyping on a breadboard and grants access to almost all ESP8266 chip pins, albeit requiring an external serial-to-USB converter and power supply. However, if you prioritize ease of use and the slightly higher price isn't an issue, the NodeMCU V1.0 module comes highly recommended.


